


A caveat: drawing and selecting in 3D is at times tricky. Sometimes it is best to be in the main overhead view.
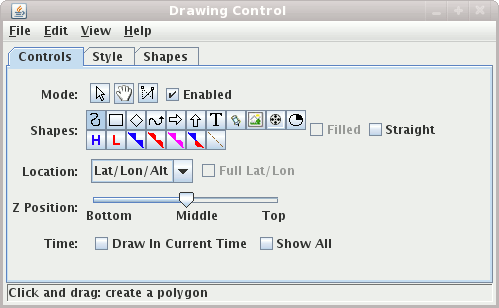
The user interface consists of 3 tabs. The first allows for the user to set the drawing mode:
Note: The drawing control will only respond to events (e.g., mouse drag to draw) when its window is being show. For example, if it is not visible in the dashboard tab then no drawing will take place.
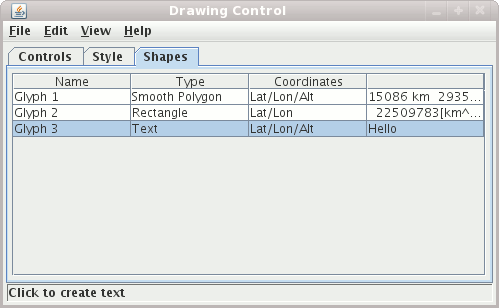
The distance and area of a shape will be shown when it is being drawn, in the Shapes list
and in the shape properties. You can change the distance unit through the
Edit->Change Display Unit... menu.
There are three editing modes, select, move and reshape:
 Allows you to select one or more drawing objects.
To select multiples press the control key. The selected objects will be shown with
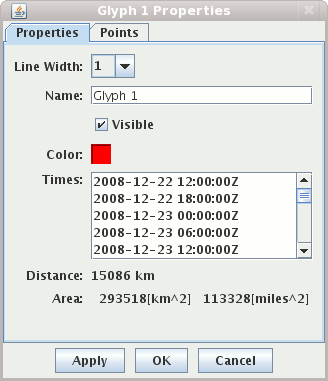
small blue rectangles. Once selected you can bring up the object's property editor
by pressing Control-P. You can also delete the selected objects by pressing Control-X.
You can select all of the objects by pressing Control-A.
Allows you to select one or more drawing objects.
To select multiples press the control key. The selected objects will be shown with
small blue rectangles. Once selected you can bring up the object's property editor
by pressing Control-P. You can also delete the selected objects by pressing Control-X.
You can select all of the objects by pressing Control-A.
A caveat: Some objects can only be selected by clicking on or near certain points. Rectangles and diamonds click near the upper left or lower right. For text click near the beginning of the text string for left justified text, near the center for center justified text or near the end for right justified text.
 Allows you to move an object.
 Allows you to move one of the points that define the location of an object.
This checkbox allows you to disable/enable drawing. For example, if you wanted to manipulate other elements in the display (e.g., probe point, cross section, other drawing controls), you can disable the drawing control so that it does not respond to any mouse events in the main display.
The shape buttons allow you to create:
 Click and drag in the main display to create a smooth polygon.
If you want to create a segmented polygon (i.e., limit the number of points and have straight lines) then
check on the "Straight" button. Click and drag in the main view. Press the space bar to
add points to your line.
Click and drag in the main display to create a smooth polygon.
If you want to create a segmented polygon (i.e., limit the number of points and have straight lines) then
check on the "Straight" button. Click and drag in the main view. Press the space bar to
add points to your line.
 ,
,  ,
,  Click and drag in the main display to create the shape.
 Click in the main display and type to enter text. When done entering text hit
 Click in the main display to create a waypoint - text and a shape.
 Click in the main display to create an image.
Select an image file from the file chooser.
Note: drawing with the image is a bit flaky. The
Click in the main display to create an image.
Select an image file from the file chooser.
Note: drawing with the image is a bit flaky. The Full Lat/Lon button controls
how the corners of the image are positioned.
The drawing control allows you to draw in four different coordinate systems:
Full Lat/Lon is not fully implemented.
Allows you to define what is the fixed Z position.
If you have the Draw in current time checkbox turned on then the graphic shapes that
that you are drawing will only be shown in the current animation time
in the 3D view. This facility allows you to, for example, annotate features
through time by drawing on the feature, stepping the time animation, and then
drawing in the next time.
To see all of the objects irrespective of their display times select the Show all checkbox.
A graphic can be shown in more than one times using the property editor. Select the object and
press Control-P to bring up the property editor.
Select the times to be displayed in in the Times list (Shift-click or Control-click to
select multiples) and press Apply or Ok.
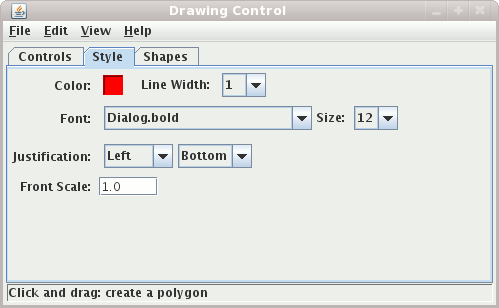
These widgets allow you to define the color, line width, font, and text justification.
There is a "Remove All" entry in the edit menu that removes all graphic objects from the display.
Under the file menu you can choose to export the objects in the drawing control. This creates a simple xml file (a .xgrf file suffix) that defines the objects and that can be re-imported.