The Field Selector consists of 4
panels:
Data Sources - used for selecting
data sources that are currently loaded into the IDV.
Formulas is a particular
data source for applying formulas to other data sources.Fields - displays the list of
data choices (parameters, formulas) for the selected data source.Displays - holds the list of
display types applicable to the selected field.Data Subset - depending on the type of data,
this panel displays the list of times, levels and spatial subsetting
associated with the selected data choice.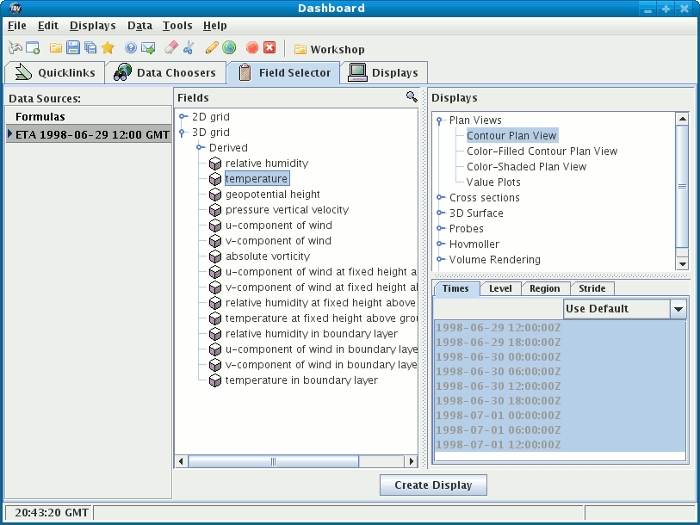
data choices.
Some of the datasets may be quite large and this allows
you to only read those portions that you need instead of the entire
dataset.
NCEP Model Data ETA
data source in the Data Sources
panel of the Field Selector
window and select the Properties menu.Data Source Properties Dialog will
have one or more tabs for setting and viewing the properties
of that data source. Tab through the properties of this
data source.Cancel button to close the windowdata choices
are created from the metadata. This allows you to select
a subset of the dataset.
NCEP Model Data ETA
data source in the Data Sources
panel of the Field Selector
window.Fields panel, you will
see two tabs - 3D grid and
2D grid indicating that this dataset has
both 2D and 3D fields in it.3D grid field to expand that tab.
The list contains those 3D fields from the dataset
that the IDV can display.temperature field. When
you select a field, the Displays
and Data Subset panels are populated with
entries applicable to that field.
Derived Choices
When a data source creates the list of data choices from the parameters in a dataset, it also uses a library of pre-defined derived quantities to create a list of choices for fields that can be calculated from the fields in the dataset.
Derived tab.Dewpoint (from T & RH).
This dataset does not have
a dewpoint field in it, but it does have temperature (T) and
relative humidity (RH) which can be used to calculate dewpoint.
Displays
panel.Flow Vectors (from GridRelative_u & GridRelative_v)
field and notice that the list of displays changes.Sounding Data (T & dewpoint only)
field and notice that you get another list of displays.Dewpoint (from T & RH)
again.Displays panel, select
Contour Plan View so we can
create a horizontal slice of the data and display it as
contours.Data Subset panel allows you to temporally and
spatially subset the data you've chosen. For this exercise, we
will look at subsetting by time and level.
Times
Each data choice may or may not have times associated with it
which are displayed in the Times
panel. If there is a set of times, you can select one of the four
menu items in the drop down menu: Use Default, Use Selected,
Match Time Driver, and Set As Time Driver.
Properties menu) on the dataset name in the
Data Sources panel to bring up the
Data Source Properties editor.Times tab,
select the Use Selected menu item
in the drop down menu. You can now select the subset of times. Select
the first five (5) times in the list
(1998-06-29 12:00:00Z
to 1998-06-30 12:00:00Z).

OK button to apply
this change and close the window.
Times tab of the Data Subset panel
when you select Dewpoint this time.Times tab.
Times tab of the Data Subset
panel, select Use Selected menu item.
1998-06-30 18:00:00Z
to 1998-07-01 12:00:00Z).Match Time Driver menu item, the IDV will check
the current active view window to make sure there is a time driver available.
Otherwise, an error message will appear to remind the user a driver is needed first.
When the IDV confirms that a time driver is available, the time list of this
dataset will be removed in the subset panel, and the times used by the time
driver in the current active display will be used. Set As Time Driver menu item, the selected times of this
dataset will be used as the driver times for this view window. Only one time
driver is allowed in each view window, and the most recent display set as the
time driver will be used. Levels
Each data choice may or may not have levels associated with it
which are displayed in the Level tab of the
Data Subset panel. If you do not select a
level, the first level is read in unless you are creating
a display that needs a volume of data.
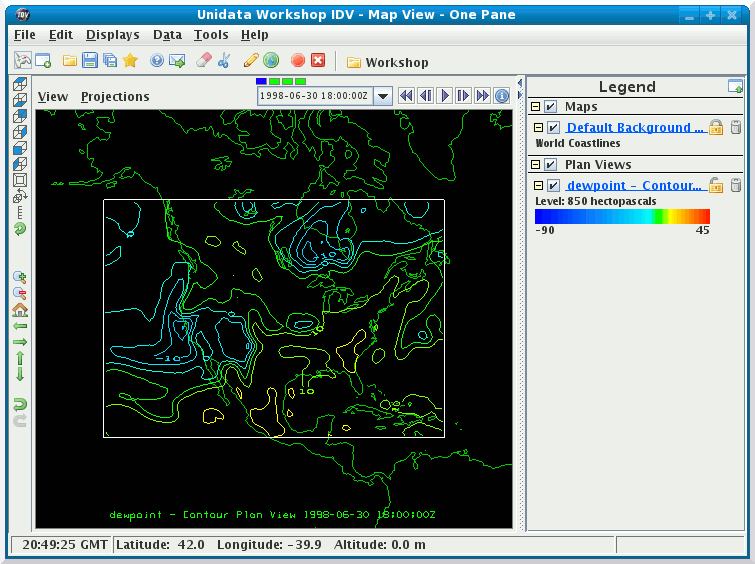
Level panel.
Level tab, select the
850 hectopascal level.
Create Display button to apply them
and create the display. The subset of data you selected will
be read from the data source and displayed in the currently active
View Window.