Time Animation Properties Dialog
Click on the  in the
Time Animation Widget
to see the Time Animation Properties editor.
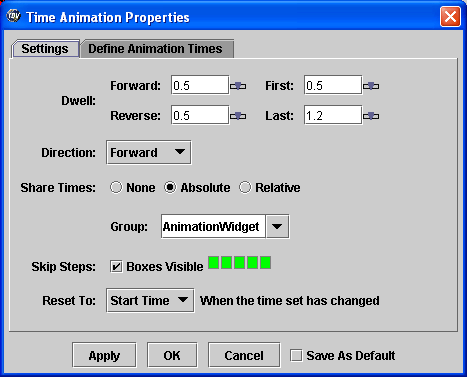
The Time Animation Properties editor allows you
to change the values that control looping. Drag the top four
scroll bars to change their value. The properties include:
-
Forward Dwell controls speed of
looping forward (seconds/frame); dwell is how long each
frame is seen when looping
-
Backward Dwell controls speed of
looping backwards (seconds/frame)
-
First Dwell how long first frame
is seen (seconds)
-
Last Dwell how long last
frame is seen (seconds)
You can set the loop Direction:
-
Forward click this button to
loop forward in time
-
Backward click this button to
loop backward in time
-
Rocking click this button to
enable rocking, where looping alternates between forward and
backward directions.
The Share Times options are used
to toggle sharing of animations among displays. You can disable
sharing None, share by Absolute time
or by Relative indices between two displays.
You can group different animation widgets and share among the group with
the Group box.
The Boxes Visible checkbox is used
to show or hide the animation step boxes on the Time Animation Widget.
The Skip Steps boxes allow you to
skip time steps in the sequence. Right click on a yellow box to
skip that step and it will turn red. Right click on a red box
and it will become yellow, indicating that the step is active.
The Reset To menu allows you to select what happens when new data/times
are added to the display. e.g., reset to beginning time, reset to last time, keep
at orginal time.
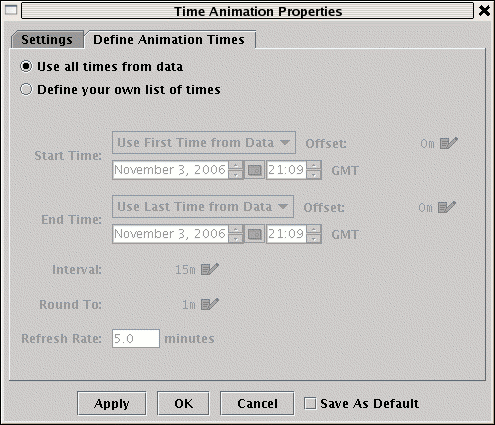
Defining Custom Animation Sets
Normally, all of the different times in a display are used to
create the set of times that are looped through. However,
the second tab in the Animation Properties dialog allows the user to define custom
animation sets:
To define your own time set select the Define your own list of times button.
The basic idea is that you define a start time, and end time and a time interval.
These times can be set from the data, from a fixed time, the current time and
relative to each other. An offset (both positive and negative) can be defined as well
by clicking on the edit button:  .
.
A simple case would be if you have a mix of satellite imagery (every 15 mintues) and radar (every 7 minutes).
You could choose the start time and end time to be set from the data. And you interval could be 5 minutes.
This would provide a uniform animation.
Another example is if you are displaying real time data (e.g., aircraft track) and you want
to see the last hour at minute increments. In this case your end time would be "Current Time (Now)".
You start time would be "Relative to End Time" with an offest of - 1 hour.
Your interval would be 1 minute.
For real time you can define a refresh rate (e.g., every 5 minutes). This will automatically update the current time
and rebuild the animation time set.
The Round To time can round the base times. e.g., to the nearest minute, hour, day, etc.


 - Show the first frame,
and stop looping if looping is on.
- Show the first frame,
and stop looping if looping is on. - Step Back one frame.
 /
/ - Toggle
looping on or off. The icon switches between
- Toggle
looping on or off. The icon switches between  - Step Forward one frame.
 - Show the last frame, and
stop looping if looping is on.
- Show the last frame, and
stop looping if looping is on.