


First, load up a couple of satellite images.
Field Selector window,
select the 1 km GOES-8 Visible
data source. 0.65 um Visible - Cloud Cover
field in the Fields panel,
and select Image Sequence Display
in the Displays panel.Times panel, select
the Use Default menu item and
select the 1998-06-29 21:15:00Z and
1998-06-29 22:15:00Z entries in the list. 
Create Display button
to load in those two images.Projections→Auto-set Projection menu item.
Field Selector window,
select the DVN (Base Reflectivity Tilt 1)
data source. Image Sequence field
in the Fields panel,
and select Image Sequence display
in the Displays panel.Times panel, make
sure the Use Default menu item
is selected.Create Display button
to load in the images.F1 key.
F2
key.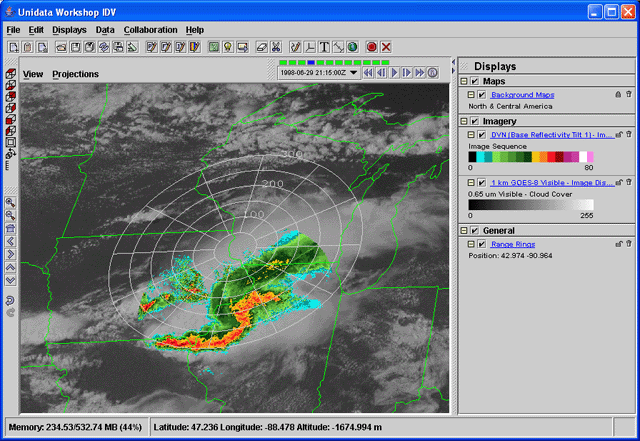
View→Use Native Image Projection menu item to
switch to the radar projection.Time Animation Properties dialog.
Define Animation Times tab and then
select the Define your own list of times option.
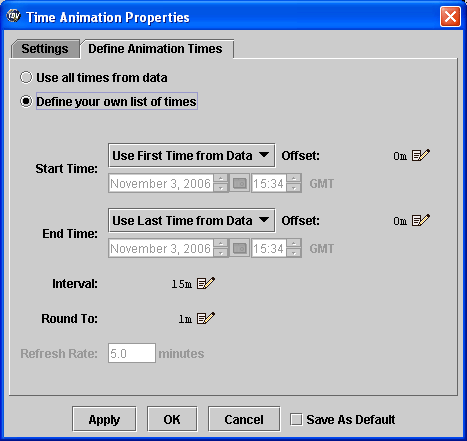
End Time select the
Relative to Start Time option.  )
to the right of the
)
to the right of the Offset: label to
set the offset from the start time. Set the offset to be
1 hour from the start time by typing 1 in the
hours box, then click OK.Interval to be 10 minutes and
set the Round to option to 5 minutes.Apply and notice how this changes the time
steps in the display.Displays→Maps and Backgrounds→Add Background Image
menu to load in the background image control. The default view
is the Blue Marble image from NASA.
Shaded Relief.Field Selector window,
select the DVN (Base Reflectivity Tilt 1)
data source. Image Sequence field
in the Fields panel,
and select Image display
in the Displays panel.
In the Times panel, make
sure the Use Default menu item
is selected and then click the
Create Display button
to load in the images.