Using Digested Passwords
Rationale
Tomcat Realms
A realm element represents a "database" of usernames, passwords, and roles (similar to Unix groups) assigned to those users.
Transport Layer Security- Passwords stored in clear text are a vulnerability if the host is compromised.
- Better to have the passwords encrypted using a cryptographic hash functions (SHA, MD2, or MD5) and then stored in
tomcat-users.xmlfile in the Tomcatconf/directory. - Tomcat can be configured to support digested passwords (this is not the default setting).
- How it works: When a client makes a request Tomcat will tell the client that a digested password is required. Based on this dialog, the client will automatically digest the password entered by the user.
Configure Tomcat to use digested passwords
- First we need to enable digest passwords support in Tomcat by modifying a couple of Tomcat Realms in the
server.xmlfile in the Tomcatconf/directory. - Create a SHA encrypted version of your password.
- Update
tomcat-users.xml. - Verify digest passwords have been successfully enabled in Tomcat.
A Tomcat Realm represents a "database" of usernames, passwords, and roles assigned to tomcat users.
| Realm Name | Purpose |
|---|---|
UserDatabaseRealm
|
The UserDatabaseRealm is enabled by default and reads clear text user password information stored in tomcat-users.xml.
|
MemoryRealm
|
The MemoryRealm reads the user password information stored in the tomcat-users.xml in a specified encrypted format.
|
Open the server.xml with your favorite editor:
$ vi server.xml
Locate the UserDatabaseRealm (in the LockOutRealm, right above the Host element) and comment it out:
<!-- Use the LockOutRealm to prevent attempts to guess user passwords
     via a brute-force attack -->
<Realm className="org.apache.catalina.realm.LockOutRealm">
  <!-- This Realm uses the UserDatabase configured in the global JNDI
       resources under the key "UserDatabase".  Any edits
       that are performed against this UserDatabase are immediately
       available for use by the Realm.  -->
     <!--
       <Realm className="org.apache.catalina.realm.UserDatabaseRealm"
       resourceName="UserDatabase"/>
       -->
</Realm>

<Host name="localhost"  appBase="webapps"
      unpackWARs="true" autoDeploy="true">
Now add the following MemoryRealm information below the commented out UserDatabaseRealm:
<!-- Use the LockOutRealm to prevent attempts to guess user passwords
     via a brute-force attack -->
<Realm className="org.apache.catalina.realm.LockOutRealm">
  <!-- This Realm uses the UserDatabase configured in the global JNDI
       resources under the key "UserDatabase".  Any edits
       that are performed against this UserDatabase are immediately
       available for use by the Realm.  -->
     <!--
      <Realm className="org.apache.catalina.realm.UserDatabaseRealm"
         resourceName="UserDatabase"/>
     -->
      <Realm className="org.apache.catalina.realm.MemoryRealm"
        digest="SHA" />
</Realm>

<Host name="localhost"  appBase="webapps"
      unpackWARs="true" autoDeploy="true">
Tomcat provides a script (${tomcat_home}/bin/digest.sh) that will encrypt a password string according to the algorithm specified. Use this
script as follows with the password you made for yourself previously:
$ /home/tds/apache-tomcat-8.0.24/bin/digest.sh -a SHA secret
secret:e5e9fa1ba31ecd1ae84f75caaa474f3a663f05f4
Replace your clear-text password in tomcat-users.xml with the encrypted version:
<tomcat-users>
    <role rolename="manager-gui"/>
    <user username="admin"
          password="e5e9fa1ba31ecd1ae84f75caaa474f3a663f05f4"
          roles="manager-gui"/>
</tomcat-users>
BASIC authentication
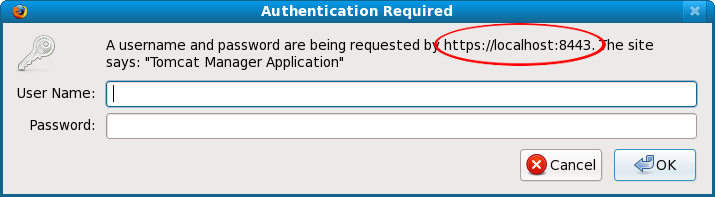
Since we are using BASIC authentication, you will need to clear any authenticated sessions in your browser to test whether digested passwords have been enabled.
Restart Tomcat and verify digest passwords have been successfully enabled by logging into the Tomcat manager application using your password
in clear text: http://localhost:8080/manager/html/
Troubleshooting
- Check the XML syntax in
tomcat-users.xmlandserver.xmlto make sure it is well-formed and without error. - Did you restart Tomcat after you made your changes to
tomcat-users.xmlandserver.xml? - Any errors will be reported in the
catalina.outfile in the Tomcatlogs/directory. - You do not need to type the encrypted version of your password into the browser (the browser auto-magically encrypts your password for you before it transmits it to the server).
Enabling TSL/SSL Encryption
How TSL/SSL works
For more information on how SSL works, Wikipedia details the steps involved during an TSL/SSL transaction.
Rationale
- Communication between two servers can be intercepted (i.e., an http transaction between client and server).
- An attacker can eavesdrop on the conversation and control the relay of messages between the victims, making them believe that they are talking directly to each other over a private connection.
- The use of digital certificates adds a layer of security by allowing the receiver of the message to verify the sender is who he or she claims to be.
- Any intercepted information that is encrypted also adds a layer of security (the attacker must take the extra step of unencrypting the data to view the message).
- Transport Layer Security (TLS), and formerly Secure Sockets Layer (SSL), is a cryptographic protocol that provides security and data integrity for communications over TCP/IP networks.
- TSL/SSL allows applications to communicate across a network in a way designed to prevent eavesdropping, tampering, and message forgery.
- TSL/SSL uses a cryptographic system that uses two keys to encrypt data: a public key known to everyone and a private or secret key known only to the recipient of the message.
- By convention, URLs that require an TSL/SSL connection start with
httpsinstead ofhttp.
CA-signed Certificates
A self-signed certificate says to your users "Trust me - I am who I say I am."
A certificate signed by a CA says, "Trust me - the CA agrees I am who I say I am."
TSL/SSL certificates
- A public key certificate is an electronic document which incorporates a digital signature to bind together a public key with identity information of the certificate user.
- The certificate can be used to verify that a public key belongs to an individual.
- The digital signature can be signed by a Certificate Authority (CA) or the certificate user (a self-signed certificate).
- Unidata highly recommends the use of a certificate signed by a Certificate Authority (CA).
- Browser warnings for self-signed certificates can be very confusing to users and make them question the legitimacy of your web site.
- It's about trust: CA-signed certificates verify your identify to your users. If the traffic between your server and the client is intercepted, an attacker can inject their own self-signed cert in the place of yours and the visitor will likely not notice.
- Self-signed certificates cannot (by nature) be revoked, which may allow an attacker who has already gained access to monitor and inject data into a connection to spoof an identity if a private key has been compromised. CAs on the other hand have the ability to revoke a compromised certificate, which prevents its further use.
Certificate keystore file
- A
keystorefile stores the details of the TSL/SSL certificate necessary to make the protocol secured. - The Tomcat documentation includes a section on importing your certificate into a keystore file.
- Tomcat uses the
keystorefile for TSL/SSL transactions. Example:
 <Connector protocol="HTTP/1.1" port="8443" maxThreads="200"
    scheme="https" secure="true" SSLEnabled="true"
    keystoreFile="${user.home}/.keystore"
    keystorePass="changeit"
    clientAuth="false" sslProtocol="TLS"/>
Enabling TSL/SSL in Tomcat
- Modify the Tomcat configuration to enable TSL/SSL:
- Verify TSL/SSL has been enabled.
- network connections (both incoming and outgoing)
- routing tables
- and a number of network interface statistics
- Check the XML syntax in
server.xmlto make sure it is well-formed and without error. - When generating the self-signed certificate, the last password (the
key password) andkeystore passwordshould be the same (changeit). If they differ, Tomcat cannot open the keystore and you will get this error:java.io.IOException: Cannot recover key. - Did you restart Tomcat after you made your changes to
server.xml? - Did you specify the full path to the
keystorefile inserver.xml?
Based on what we know about Tomcat configuration, which file in ${tomcat_home}/conf should we edit to to enable TSL/SSL?
Open ${tomcat_home}/conf/server.xml with your favorite editor:
$ vi server.xml
Locate the Java HTTP/1.1 Connector listening on port 8080 and verify it is redirecting TSL/SSL traffic to port 8443:
<Connector port="8080"
           protocol="HTTP/1.1"
           connectionTimeout="20000"
           redirectPort="8443" />
Find and uncomment the SSL HTTP/1.1 Connector listening on port 8443 to activate this connector:
<Connector port="8443"
           protocol="HTTP/1.1"
           SSLEnabled="true"
           maxThreads="150"
           scheme="https"
           secure="true"
           clientAuth="false"
           sslProtocol="TLS" />
Add a keystoreFile attribute to the SSL HTTP/1.1 Connector to tell Tomcat where to find your keystore:
<Connector port="8443"
           protocol="HTTP/1.1"
           SSLEnabled="true"
           maxThreads="150"
           scheme="https"
           secure="true"
           clientAuth="false"
           sslProtocol="TLS"
           keystoreFile="/home/tds/apache-tomcat-8.0.24/conf/keystore" />
Since we opted to not use the default keystore password, we need to specify the new password so Tomcat can open the file:
<Connector port="8443"
           protocol="HTTP/1.1"
           SSLEnabled="true"
           maxThreads="150"
           scheme="https"
           secure="true"
           clientAuth="false"
           sslProtocol="TLS"
           keystoreFile="/home/tds/apache-tomcat-8.0.24/conf/keystore"
           keystorePass="foobar" />
Restart Tomcat:
$ ${tomcat_home}/bin/shutdown.sh
$ ${tomcat_home}/bin/startup.sh
Verify Tomcat is listening on port 8443 by running the netstat command:
$ netstat -an | grep tcp | grep 8443
man netstat
Run man netstat in your terminal window to learn more about this command.
netstat (short for network statistics) is available on Unix, Unix-like, and Windows NT-based operating systems. It is a
command-line tool that displays:
Look for the following in the output:
tcp 0 0 :::8443 :::* LISTEN
Troubleshooting
Configuring web applications for TSL/SSL
Looking Ahead
Other than the compelling security reasons, you will want to enable TSL/SSL to take advantage of a couple of monitoring and debugging tools: the TDS Remote Management Tool, and the TdsMonitor Tool -- both of which (out-of-the-box) require TSL/SSL to access.
- The web application deployment descriptor, aka
web.xml, specifies if all or parts of it need to be accessed via TSL/SSL. - Deployment descriptors are found in the
WEB-INFdirectory of the web application:${tomcat_home}/webapps/application_name/WEB-INF/web.xml. - By convention, Tomcat and other servlet containers will read the web application deployment descriptors for initialization parameters and container-managed security constraints upon application deployment.
- The TDS has been pre-configured to require that TSL/SSL encryption is enabled in order to access the both the TDS Remote Management Tool, and the TdsMonitor Tool.
web.xml from the TDS Remote Management Tool:
  <!-- This allows "remote configuration":
    /thredds/admin/debug gives access to various debug and status info.
    /thredds/admin/content/ -> "{tomcat_home}/content/thredds/"
    /thredds/admin/root/ -> "{tomcat_home}/webapps/thredds/" DISABLED
    /thredds/admin/dataDir/path -> "{dataRoot(path)}/webapps/thredds/"  DISABLED
   -->
  <security-constraint>
    <web-resource-collection>
      <web-resource-name>sensitive read access</web-resource-name>
      <url-pattern>/admin/*</url-pattern>
      <http-method>GET</http-method>
    </web-resource-collection>
    <auth-constraint>
      <role-name>tdsConfig</role-name>
    </auth-constraint>
    <user-data-constraint>
      <transport-guarantee>CONFIDENTIAL</transport-guarantee>
    </user-data-constraint>
  </security-constraint>
Configuration help
For more information on how to configure security requirements for a web application in a deployment descriptor, see: Defining Security Requirements for Web Applications.
- The
<user-data-constraint>establishes a requirement that the constrained requests be received over a protected transport layer connection. This guarantees how the data will be transported between client and server. <transport-guarantee>choices for type of transport guarantee includeNONE,INTEGRAL, andCONFIDENTIAL:- Specify
CONFIDENTIALwhen the application requires that data be transmitted so as to prevent other entities from observing the contents of the transmission. (E.g., via TSL/SSL.) - Specify
INTEGRALwhen the application requires that the data be sent between client and server in such a way that it cannot be changed in transit. - Specify
NONEto indicate that the container must accept the constrained requests on any connection, including an unprotected one.
Accessing TDS Monitoring and Debugging Tools
Other than the compelling security reasons, you will want to enable TSL/SSL to take advantage of a couple of monitoring and debugging tools: the TDS Remote Management Tool, and the TdsMonitor Tool -- both of which (out-of-the-box) require TSL/SSL to access.
- Enable TSL/SSL in Tomcat
- Modify
${tomcat_home}/conf/tomcat-users.xmlto add the newtdsConfigandtdsMonitorroles. Add these roles to your list of roles: - Restart Tomcat
- Qualys SSL Server Test
is a free online service that analyzes the configuration of any public TSL/SSL web server. Note: be sure to check the Do not show the results on the boards box if you do not want your results to be public. - TSL/SSL Configuration HOW-TO
The Apache Tomcat document detailing how to enable TSL/SSL. - Tomcat Migration Guide
A document detailing the various changes between Tomcat versions. - When are self-signed certificates acceptable?
A compelling argument as to why self-signed certificates should not be used in a production environment.
If Tomcat has not already been configured to run via TSL/SSL, follow the tutorial in the previous section to Enable TSL/SSL in Tomcat.
<tomcat-users>
    <role rolename="manager-gui"/>
    <role rolename="tdsConfig"/>
      <role rolename="tdsMonitor"/>
    <user username="admin"
          password="e5e9fa1ba31ecd1ae84f75caaa474f3a663f05f4"
          roles="manager-gui,tdsConfig, tdsMonitor"/>
</tomcat-users>
Resources
Securing the Tomcat manager Application
Changes to the manager application
The manager application URLs and roles has been re-structured. See the Tomcat Migration
guide for more information.
Rationale
- "Free" web application that comes with Tomcat distribution that lives in the Tomcat Lives in the
${tomcat_home}/webapps/managerdirectory. - Not enabled by default.
- Allows Tomcat administrators to deploy, undeploy, or reload web applications such as the TDS without having to shut down and restart Tomcat.
- If exploited, an attacker can use the
managerapplication to install programs on your server willy-nilly. - If you choose to enable the
managerapplication, we highly recommend enabling digested passwords and TSL/SSL encryption for themanager. - Restricting access to the
managerapplication to a small subset of IP addressess or host names using a Tomcat valve, etc., is also a good idea. - Uninstall this application if you don't plan to use it.
Enabling TSL/SSL for the Tomcat manager application
- Modify the deployment descriptor of the Tomcat
managerapplication. - Verify TSL/SSL has been enabled for the Tomcat
managerapplication. - NOTE: You will have to redo this every time you upgrade Tomcat.
Using your favorite editor, open the deployment descriptor for the Tomcat manager application:
$ vi ${tomcat_home}/webapps/manager/WEB-INF/web.xml
Locate the <security-constraint> elements (near the bottom of the file):
<!-- Define a Security Constraint on this Application -->
<!-- NOTE:  None of these roles are present in the default users file -->
<security-constraint>
  <web-resource-collection>
    <web-resource-name>
      HTML Manager interface (for humans)
    </web-resource-name>
    <url-pattern>/html/*</url-pattern>
  </web-resource-collection>
  <auth-constraint>
     <role-name>manager-gui</role-name>
  </auth-constraint>
</security-constraint>
<security-constraint>
  <web-resource-collection>
    <web-resource-name>
      Text Manager interface (for scripts)
    </web-resource-name>
    <url-pattern>/text/*</url-pattern>
  </web-resource-collection>
  <auth-constraint>
     <role-name>manager-script</role-name>
  </auth-constraint>
</security-constraint>
<security-constraint>
  <web-resource-collection>
    <web-resource-name>JMX Proxy interface</web-resource-name>
    <url-pattern>/jmxproxy/*</url-pattern>
  </web-resource-collection>
  <auth-constraint>
     <role-name>manager-jmx</role-name>
  </auth-constraint>
</security-constraint>
<security-constraint>
  <web-resource-collection>
    <web-resource-name>Status interface</web-resource-name>
    <url-pattern>/status/*</url-pattern>
  </web-resource-collection>
  <auth-constraint>
     <role-name>manager-gui</role-name>
     <role-name>manager-script</role-name>
     <role-name>manager-jmx</role-name>
     <role-name>manager-status</role-name>
  </auth-constraint>
</security-constraint>
The Tomcat 8 version of the manager application deployment descriptor contains a <security-constraint> section for each of
the four possible ContactPaths (as per Manager Application section of the
Tomcat Migration Guide).
Add a <user-data-constraint> with a <transport-guarantee> of CONFIDENTIAL for the desired ContactPaths
to to enable port-forwarding to port 8443:
<!-- Define a Security Constraint on this Application -->
<!-- NOTE:  None of these roles are present in the default users file -->
<security-constraint>
  <web-resource-collection>
    <web-resource-name>
     HTML Manager interface (for humans)
    </web-resource-name>
    <url-pattern>/html/*</url-pattern>
  </web-resource-collection>
  <auth-constraint>
     <role-name>manager-gui</role-name>
  </auth-constraint>
  <user-data-constraint>
    <transport-guarantee>CONFIDENTIAL</transport-guarantee>
  </user-data-constraint>
</security-constraint>

<security-constraint>
  <web-resource-collection>
    <web-resource-name>
     Text Manager interface (for scripts)
    </web-resource-name>
    <url-pattern>/text/*</url-pattern>
  </web-resource-collection>
  <auth-constraint>
     <role-name>manager-script</role-name>
  </auth-constraint>
  <user-data-constraint>
    <transport-guarantee>CONFIDENTIAL</transport-guarantee>
  </user-data-constraint>
</security-constraint>

<security-constraint>
  <web-resource-collection>
    <web-resource-name>JMX Proxy interface</web-resource-name>
    <url-pattern>/jmxproxy/*</url-pattern>
  </web-resource-collection>
  <auth-constraint>
     <role-name>manager-jmx</role-name>
  </auth-constraint>
  <user-data-constraint>
    <transport-guarantee>CONFIDENTIAL</transport-guarantee>
  </user-data-constraint>
</security-constraint>

<security-constraint>
  <web-resource-collection>
    <web-resource-name>Status interface</web-resource-name>
    <url-pattern>/status/*</url-pattern>
  </web-resource-collection>
  <auth-constraint>
     <role-name>manager-gui</role-name>
     <role-name>manager-script</role-name>
     <role-name>manager-jmx</role-name>
     <role-name>manager-status</role-name>
  </auth-constraint>
  <user-data-constraint>
   <transport-guarantee>CONFIDENTIAL</transport-guarantee>
  </user-data-constraint>
</security-constraint>
Restart Tomcat and verify TSL/SSL has been enabled for the Tomcat manager application: http://localhost:8080/manager/html/
Troubleshooting
- Check the XML syntax in
web.xmlto make sure it is well-formed and without error. - Did you specify a
<transport-guarantee>ofCONFIDENTIAL? - Did you restart Tomcat after you made your changes to
web.xml?
Resources
- Manager App HOW-TO
The Apache Tomcat document referencing how to use and configure themanagerapplication. - Tomcat Migration Guide
A document detailing the various changes between Tomcat versions contains a section dedicated to themanagerapplication.
Blocking Non-Essential Port Access At The Firewall
Rationale
- It is easy to issue commands to Tomcat if you know:
- the correct port number; and
- the command expected on that port.
- Unless you are on a private network, you need a firewall to restrict who is allowed to access network ports.
- We recommend working with your systems/network administrator to block access to all non-essential ports at the firewall.
For running the TDS, keep in mind the following:
- Port 8080 should have unrestricted access unless you plan to proxy requests to Tomcat from and HTTP server.
- If you are using any of the TDS monitoring and debugging tools, or the Tomcat
managerapplication, you must also open up port 8443.
Resources
- Your local systems/network administrator:

Restricting Access To The TDS By Remote IP Address Or Host
Rationale
Tomcat Valves
A valve element represents a component that will be inserted into the request processing pipeline for the associated Catalina container.
- Use the Tomcat
RemoteHostValveorRemoteAddrValveto restrict access to the TDS and/or other web applications. - Configured in the Tomcat
conf/server.xmlfile. - Valve declarations can be used to either allow or deny access to content.
- Utilize the valves for adding an extra layer of security to the
managerapplication to limit accessed to it from within a specific IP address range. - Caveat: these valves rely on incoming IP addresses or hostnames which are vulnerable to spoofing. Also, not much help when dealing with DHCP.
Examples
- Using the
RemoteAddrValveto restrict access based on IP addresses. - Using the
RemoteHostValveto restrict access based on resolved host names. - Using wildcard characters.
- Using the
RemoteAddrValveto limit access to a specific range of IP addresses.
<!-- This example denies access based on IP addresses -->
<Valve className="org.apache.catalina.valves.RemoteAddrValve"
       deny="128\.117\.47\.201,128\.107\.157\.210,96\.33\.56\.215" />
<!-- This example denies access based on host names -->
<Valve className="org.apache.catalina.valves.RemoteHostValve"
           deny="www\.badguys\.com,www\.bandwidthhog\.net" />
<!-- Wildcard characters can with the both valves -->
<Valve className="org.apache.catalina.valves.RemoteAddrValve"
       deny="128\.117\.47\..*" />
<!-- This example only allows the specified IPs to access  -->
<Valve className="org.apache.catalina.valves.RemoteAddrValve"
          allow="128\.117\.140\..*" />
Resources
- The Valve Component
Tomcat documentation about the variousvalvecomponents available for use.
Reverse Proxy
Rationale
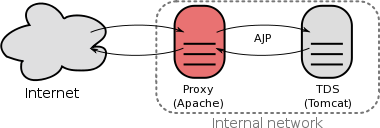
- A reverse proxy is a proxy server that appears to clients to be an ordinary server. Requests are forwarded to one or more origin servers which handle the request. The response is returned as if it came directly from the proxy server.
- Reverse proxies can be used to hide the existence and characteristics of the origin server(s) and can be an additional layer of defense and can protect against some OS and web server specific attacks. This additional security layer forces an attacker to attack the proxy because the firewall allows only the proxy to communicate with the back-end content servers.
- However, it does not provide any protection to attacks against vulnerabilities in the web application or proxy service itself (e.g., Apache, Tomcat).
- If an attacker can use the front-end proxy server to launch an attack on the back-end servers if he/she manages to exploit the web application, proxy transaction or some other service running on the proxy server.
Resources
- Running The TDS Behind a Proxy Server
How to set up a reverse proxy for the TDS using Tomcat and the Apache HTTP server.
Running Tomcat with a Security Manager
Rationale
- The JVM Security Manager that comes with Tomcat imposes a fine-grained security restrictions to all Java applications running the JVM.
- It confines the Java applications in a sandbox, and restricts them from utilizing certain features of the Java language Tomcat normally is able to access.
- If you are hosting untrusted servlets or JSP on your server, then implementing the Security Manager may be a good idea.
- Be aware the Security Manager may prevent trusted web applications (like the TDS) from performing certain functions if configured too restrictively.
Resources
- Security Manager HOW-TO
Information on the default settings of the Java Security Manager and instructions on how to make changes to these settings.
Protecting the Tomcat SHUTDOWN Port
SHUTDOWN on port 8005
- Tomcat uses a the default port of 8005 as the designated shutdown port. Shutdown scripts make a call to this port and issue the
SHUTDOWNcommand. - If need be, you can always change the shutdown command or even the port number in
${tomcat_home}/conf/server.xml.