


All McIDAS-X windows have a title bar that contains the following information:
where yyyy is the year of the distribution; l is the addendum level of the version; and user@workstation displays your McIDAS logon name and the workstation running your McIDAS session.
You can scroll in a text frame using the arrow keys or the PgUp/PgDn keys on the keyboard. You can switch between text frames with the numeric keypad on your keyboard.
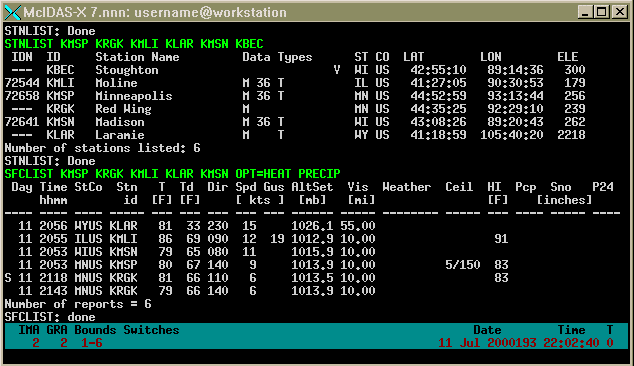
The examples below show the text output from the SFCLIST command in the text and command window.
Positional parameters are words, numbers, or letters that further define a command. You must enter positional parameters in the exact order specified in the command format. It is not always necessary to use every positional parameter. If you want to specify the default value for a positional parameter, enter an X in its place.
You can also add keywords to the command to further clarify a command function. Keywords are optional and their order in the command is not important, provided they follow the positional parameters and precede quoted text.
Some arguments (positional parameters, keyword parameters) like dates, latitudes, and longitudes must conform to certain formats. The ARGHELP command can be used to get a listing of these argument formats.
Most keywords are command specific; however the six global keywords below can be used with any McIDAS command.
The DEV= keyword specifies the destination device of text output generated by a command.
The FONT= keyword specifies the font for drawing text on the image window.
The MCCompress= keyword specifies the compression method for the ADDE transfer of data.
The PAN= keyword specifies the frame panel number for displaying output or reading frame information.
The TCOL= keyword specifies the text output color for text written to the text window.
The TWIN= keyword specifies the destination text frame for text message output.
The VIRT= keyword specifies a virtual graphics number to write the graphics output to.
See the Unidata McIDAS User's Guide or run the GLOBKEY command for more information.
A sample command line is shown below:
| ZA | 3 20 C | POS=200 200 | "McIDAS |
| | | \ / | | | | |
| command | parameters | keyword | quoted text |
To run single letter commands, simultaneously press the Alt key and the letter key, or type the letter and press Enter. Below is an example of the format for single letter commands in the Learning Guide.
To run multiple letter commands, type the command and press Enter. This Learning Guide assumes you will always press Enter after typing the command. Below is an example of the command format in the Learning Guide.
This means you should type CW 1 3 and then press Enter. You can have multiple spaces between parameters and keywords.
A command line can contain several commands. To concatenate commands, type a semicolon between the commands. For example:
When multiple commands are entered on the command line, each command is run in the order it is listed. The first command must finish before the next command can begin.
Some commands have a quote (") field that indicates all text following the quote belongs to that command. When concatenating commands with quote field, you need to replace the double quote with a left brace ({) and place a right brace before the semicolon to surround the quote field. For example, typing:
Several keys are available for editing the command line. Listed below are command line editing keys and their functions.
| Key | Function |
| Home | moves the cursor to the beginning of the line |
| End | moves the cursor to the end of the line |
| Insert | toggles the insert typing mode |
| Delete | deletes the character over the cursor |
| Backspace | deletes the character to the left of the cursor |
| Right/Left arrows | moves the cursor one character to the right or left |
| Tab, Shift Tab | moves the cursor one parameter to the right or left |
| Enter | runs the command |
| Esc | erases the command from the command line and places the cursor at the beginning of the line |
| Alt ? | displays an abbreviated help for the current command in the text frame |
| & and ^ | recalls a command if the command line is empty; & recalls the previous command from a list of the last 100 commands entered;^ scans the call list in the opposite direction |
| Ctrl LeftMouseButton | Prints the latitude and longitude of the cursor position on the command line |
McIDAS-X status line:
 IMA GRA Bounds Switches                          Date        Time   T  Unseen TFILE
 [2] [2]  1-3       L                        23 Oct 2000297 15:43:31 0    1      4
The McIDAS-X status line above lists the current image frame (2), the current graphics frame (2), the loop bounds (1-3), command switches (L - looping turned on), current date in UTC (Gregorian [23 Oct] and Julian [1996297]), the current UTC time (15:43:31) and the current text frame (0). Unseen indicates that text has been written to the text frame indicated (1) (in red) since the last time it was opened. TFILE indicates that the output in the highlighted text frame listed below it (4) (in blue) is being written to a file with the TFILE command. If there are no Unseen windows, or TFILE is not running, these labels will not appear on the line.
You can also get information on the status of your session using the F command. The output includes the number and size of frames, current and opposite frame numbers, current loop bounds, K and L toggle states, cursor type, cursor size, cursor color and its position on the frame as shown below.
   Video Status for Your Workstation
                           Frames(s)
                           ---------
Number Available                  6
Current                           1   (Opp =  4 )
Loop Bounds                    1 to   6
Visible (K & W toggle)          Yes / Yes
Looping (L toggle)               No
Cursor parameters: Size =   31 /   31         Type = Xhair
        Center position =  206 /  396         Color = RED

Image frames   1 -   6     with imbedded graphics    are  480 BY  640