Configure TDS To Allow WCS, WMS, and ncISO Access
Out of the box, the TDS distribution will have WCS, WMS, and ncISO enabled.
If you do not wish to use these services, they must be explicitly allowed in the threddsConfig.xml file.
Please see the threddsConfig.xml file documentation for information on how to disable these services.
The default threddsConfig.xml file (which should now be in your ${tds.content.root.path}/content/thredds directory) contains commented out sections for each of these services.
WCS Configuration
The following section in the threddsConfig.xml file controls the WCS service:
<WCS>
  <allow>true</allow>
  ...
</WCS>
Additional WCS configuration options can be set in the threddsConfig.xml file.
More details are available in the WCS section of the threddsConfig.xml file documentation.
WMS Configuration
The following section in the threddsConfig.xml file controls the WMS service:
<WMS>
  <allow>true</allow>
  ...
</WMS>
Additional WMS configuration options can be set in the threddsConfig.xml file,
More details are available in the WMS section of the threddsConfig.xml file documentation.
ncISO Configuration
The following section in the threddsConfig.xml file controls the ncIso services:
<NCISO>
  <ncmlAllow>true</ncmlAllow>
  <uddcAllow>true</uddcAllow>
  <isoAllow>true</isoAllow>
</NCISO>
Each *Allow element allows one of the three ncISO services.
Adding WCS And WMS Services
As long as the WCS and WMS services are enabled, all that is required for the TDS to provide WCS and WMS access to datasets is for those datasets to reference WCS and WMS service elements.
Adding them to an existing compound service would look something like this:
<service name="grid" serviceType="Compound" base="" >
    <service name="odap" serviceType="OpenDAP" base="/thredds/dodsC/" />
    <service name="wcs" serviceType="WCS" base="/thredds/wcs/" />
    <service name="wms" serviceType="WMS" base="/thredds/wms/" />
    <service name="ncss" serviceType="NetcdfSubset" base="/thredds/ncss/" />
    <service name="http" serviceType="HTTPServer" base="/thredds/fileServer/" />
</service>
Adding ncISO Services
Similar to above, as long as the ncISO services are enabled, all that is required for the TDS to provide ncISO services on datasets is for those datasets to reference the ncISO service elements.
For instance, adding to the same compound service as above:
<service name="grid" serviceType="Compound" base="" >
    <service name="odap" serviceType="OpenDAP" base="/thredds/dodsC/" />
    <service name="wcs" serviceType="WCS" base="/thredds/wcs/" />
    <service name="wms" serviceType="WMS" base="/thredds/wms/" />
    <service name="ncss" serviceType="NetcdfSubset" base="/thredds/ncss/" />
    <service name="http" serviceType="HTTPServer" base="/thredds/fileServer/" />
    <service name="ncml" serviceType="NCML" base="/thredds/ncml/" />
    <service name="uddc" serviceType="UDDC" base="/thredds/uddc/" />
    <service name="iso" serviceType="ISO" base="/thredds/iso/" />
</service>
Example: Setup WCS And WMS Access For NAM Data
-
Edit the TDS configuration file and allow
WCSandWMSservices:$ cd ${tds.content.root.path}/thredds $ vim threddsConfig.xmland add/replace the
WCSandWMSelements:<WCS> <allow>true </allow> </WCS> <WMS> <allow>true</allow> </WMS> -
Edit the
catalog.xmlfile and addWCSandWMSservices to the NAM dataset:<service name="wcs" serviceType="WCS" base="/thredds/wcs/" /> <service name="wms" serviceType="WMS" base="/thredds/wms/" /> -
Restart Tomcat so the TDS is reinitialized:
$ cd ${tomcat_home}/bin $ ./shutdown.sh $ ./startup.sh - Test that
WCSandWMSare working:- Bring the catalog up in a browser: http://localhost:8080/thredds/catalog.html
- Click down to one of the NAM dataset pages.
- Select the
WCSAccess link - Go back, select the
WMSAccess link
- Check Dataset Viewer Links for Godiva2 (ToolsUI and Godiva2 are there but IDV is not).
Adding Grid DataType To Datasets
Once datasets are accessible over the WMS and WCS services, a quick look at the dataset pages shows several Viewer links available for each dataset (ToolsUI and Godiva2).
The IDV Viewer link is only added for datasets with a Grid data type.
This is not whether the dataset is recognized by the CDM as gridded but rather if the metadata in the catalog indicates that the dataset is a Grid.
This is accomplished with the dataType metadata element:
<dataType>Grid</dataType>
Example: Add Grid DataType To The NAM Data
- Edit the
catalog.xmlfile and add aGriddataTypeelement (as above) to the NAM dataset. -
Restart Tomcat so the TDS is reinitialized:
$ cd ${tomcat_home}/bin $ ./shutdown.sh $ ./startup.sh - Check the dataset pages for the IDV Viewer link.
More WMS Configuration
Besides the basic WMS configuration available in the threddsConfig.xml file, there are additional configuration settings in the wmsConfig.xml file.
These settings can be applied globally, by dataset, by variable in a dataset, or to variables in any dataset by CF standard name.
Default Image Styling
There are additional configuration settings for default image styling including settings for the default values of color scale range, palette name, and number of color bands as well as whether to use a linear or logarithmic scale.
Interval Time vs Full Time List in GetCapabilities Documents
By default, the WMS will list all time values in a GetCapabilities document.
For long time-series, this list can cause the GetCapabilities document to be quite large.
Datasets/variables can be configured to use time intervals with the addition of an intervalTime element in the wmsConfig.xml file.
For instance:
<intervalTime>true</intervalTime>
Unfortunately, though time intervals are part of the WMS specification, not all WMS clients know how to interpret time intervals in the GetCapabilities document.
Example: Modifying The wmsConfig.xml File
- Open a dataset in Godiva2 and plot a parameter.
- Notice the default color scale range is
[-50,50]. Decide on a better color scale range. - Open the “
WMSDetailed Configuration” page in your browser. -
Edit the
wmsConfig.xmlfile:$ cd ${tds.content.root.path}/thredds $ vi, wmsConfig.xmland change the color scale range for the target parameter in the chosen dataset.
- Reopen Godiva2 on the dataset and plot the target parameter. Check the new default color scale range.
Styling Features And Non-Standard Requests
ncWMS provides several styling and displaying capabilities that are also available in TDS:
- The
WMStries to identify vector components that it can combine and display as a single vector layer. It looks for CFstandard_nameattributes with values of the formeastward_*andnorthward_*and combines those that match into a vector layer. ncWMSprovides several vector styles:barb,stumpvec,trivec,linevec, andfancyvec.- Some styling properties can be specified through the non-standard optional parameters supported by
ncWMS:GetTransectGetVerticalProfileGetVerticalSection
Example: WMS Request With Styling Parameters
- Open the non-standard optional parameters supported by
ncWMSpage. - Make several
WMSrequest changing the color scale range and the displaying properties for the values out of range. - Use this as base request.
Using WCS And WMS
Various WCS And WMS Clients
- GoogleEarth (WMS) [free]
- Godiva3 (WMS) [free - distributed with TDS]
- NASA WorldWind (WMS) [free]
- IDV (WMS) [free]
- ToolsUI (WMS) [free]
- OWSlib (WMS and WCS) [free]
- Map Express (
WMSandWCS) [commercial / free] - IDL (WMS) [commercial]
- gvSIG (WMS and WCS) [free]
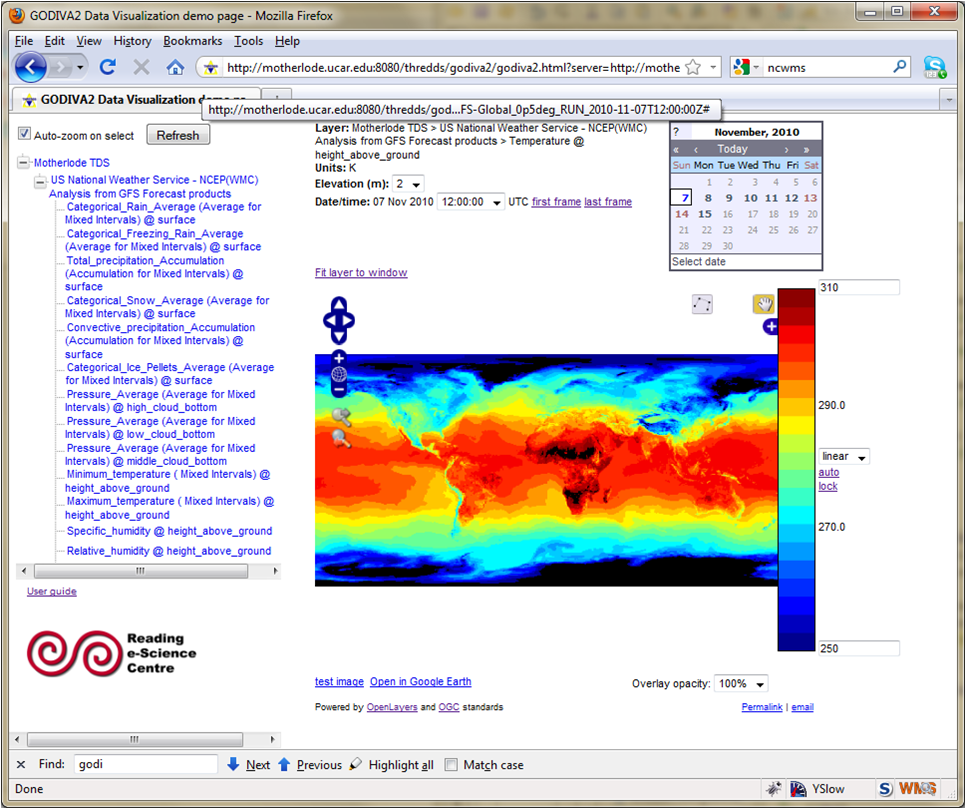
Godiva2 WMS Client
The Godiva2 WMS client is part of the ncWMS code base and as such is included in the TDS distribution.
It is a web application written in JavaScript using the OpenLayers library.
In the TDS, you can access the Godiva2 client from the Viewers section of all WMS accessible datasets.
The Godiva2 User Guide is available from the ncWMS site.