

 Unidata's Integrated Data Viewer > Tools

6.9 Image and Movie Capture
You can capture the main 3D view as an image,
a QuickTime movie or an animated GIF.
6.9.0 Saving Images
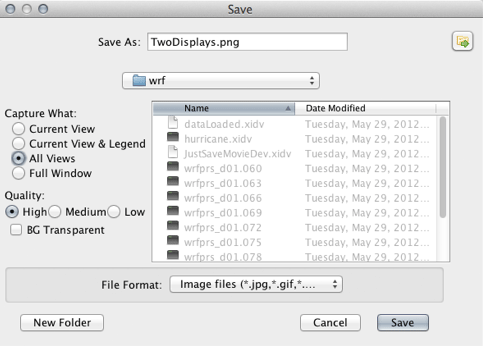
You can save a display as an image. Select the
menu item.
A file dialog will
popup where you can enter a file name for the image file. The IDV
supports JPEG, PNG and GIF formats.
From this File Dialog you can also specify the image quality (only
used for JPEG's) and what to capture.
Note: when capturing a image the screen cannot be obscured.
The IDV can also write out an image and the corresponding
Google Earth KML or KMZ file. For this to be correct the
projection must be a Lat/Lon geographic projection (i.e., rectilinear)
and in an overhead view. The simplest way to get a correct projection
is to select the
menu item. If you specify a .kml file the IDV will generate
an image with the same file prefix and the kml file that refers
to the image. If you specify a .kmz file the IDV this file
(which is a zip format) will contain the image and the kml file.
6.9.1 Print Current View
You can send any display to a printer. Select the
menu item.
A Print dialog will popup where you can configure and print an image.
6.9.2 Save Movies
You can save any sequence of displays as a QuickTime movie or animated GIF.
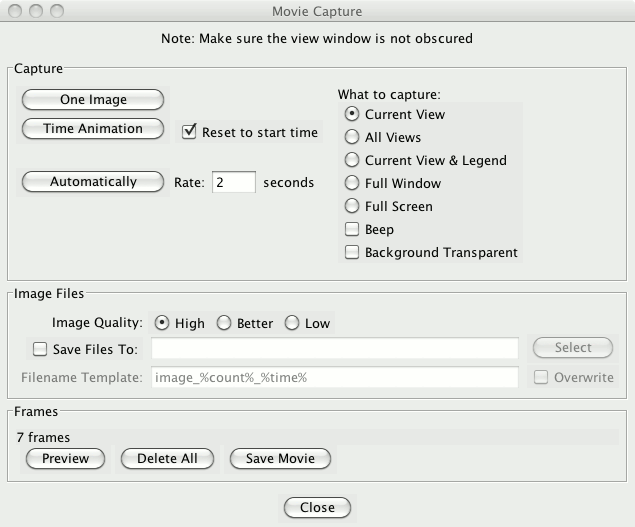
Select the menu item
to bring up the "Image capture" window:
To make a QuickTime movie or animated GIF
there are three steps: capturing the frames, previewing the
frames, and creating the movie.
To capture frames, in the Capture section of the "Image capture"
window, do one of the following three choices:
- click on the One Image button to make a single frame
of the current IDV display. Then you change the display to exactly what
you want in the next frame, capture that new image, and continue through
the movie.
- Click on Time Animation to automatically capture all
frames in a display time sequence which you can animate with the usual
IDV Time Animation Controls. Check
Reset to start time to ensure that you capture the entire
animation sequence. The movie animation capture starts on the first
frame visible in the IDV and goes to the end. So you can use this to
capture part of a sequence.
- Click on Automatically to start taking snapshots of
frames from the IDV display while you make changes, such as
changing the viewpoint by zooming, rotation, and panning, and combinations
of all three. To stop the automatic snapshots, click on the button again
(which now says Stop). You can set the automatic snapshot sampling rate
with the field.
You can combine these different methods of capture. The list of frames
is additive.
If you want to save the individual intermediate files that are used
to create the movie, select checkbox and
specify a directory and file name format. Otherwise, the intermediate
files will be saved in a temporary directory and will be removed after
the movie is saved.
You can use the following templates to customize the name of the
output file:
- %count% is the image counter
- %count:decimal format% allows you to format the count using
the same rules defined in the lat/lon format section of the
User Preferences. (or
Google 'java decimalformat' for more information).
- %time% is the animation time in the default format
- %time:time format% a template that begins with
"time:" and contains a time format string using the
the same date formatting rules described in the
User Preferences.
You can the movie and remove individual frames
or the frames.
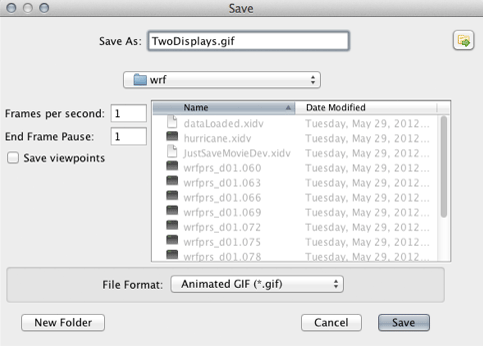
When done capturing frames select the button
to specify the QuickTime movie file (.mov) or the animated GIF file (.gif).
You can now set the final properties of the movie you wish to save:
- Save As: Name of the movie file you wish to create.
- Frames per second: Number of captured images to show (per
second).
- End Frame Pause: Time (in seconds) to pause the last image in
the movie.
- Save viewpoints: Save the viewpoints (check to enable).
- File Format: Format of the movie file.
6.9.3 Play QuickTime Movies
The IDV supports displaying certain types of QuickTime movies (including
the ones the IDV generates). Just load in the QuickTime movie from
the File Data Chooser.


 Unidata's Integrated Data Viewer > Tools


