This section demonstrates how to run the TDS and Tomcat Servlet Container behind an Apache HTTP proxy server using the mod_jk connector.
About Reverse Proxies
View the Wikipedia entry on Reverse Proxies for more information on reverse proxies uses and types of proxies servers.
Uses Of Reverse Proxies
-
A reverse proxy is a proxy server that appears to clients to be an ordinary server. Requests are forwarded to one or more origin servers which handle the request. The response is returned as if it came directly from the proxy server.
- Reverse proxies can be used to hide the existence and characteristics of the origin server(s) and can be an additional layer of defense and can protect against some OS and WebServer specific attacks. However, it does not provide any protection to attacks against vulnerabilities in the web application or proxy service itself (e.g., Apache, Tomcat).
- A reverse proxy can also be used for load balancing, caching content, content compression, and SSL acceleration.
Using Tomcat And Apache HTTP Server
Other HTTP servers (e.g., NGINX) have not yet been explored.
There are three options to choose from for configuring the Apache HTTP Server as a front-end proxy server for the TDS. They differ in their communication protocol, features, and ease of use:
-
The Apache HTTP Server’s
mod_proxy/mod_proxy_httpwith Tomcat’s HTTP connectorThis method is perhaps the simplest to implement, may not require much additional configuration in both Tomcat and the Apache HTTP Server, and is appropriate for basic reverse proxy scenarios.
-
The Apache HTTP Server’s
mod_proxy/mod_proxy_ajpmodules with Tomcat’s AJP connectorUtilizing
mod_proxy_ajpwithmod_proxyallows you to leverage the Apache JServ Protocol (AJP) to faciliate communication between the Apache HTTP Server and Tomcat. AJP typically offers improving performance, load balancing handling, static content serving, and security enhancements. -
The Apache Tomcat Connectors project’s
mod_jkmodule with the Tomcat AJP connectormod_jkoffers the performance advantages of AJP, in addition to advanced load balancing capabilities and node failure detection. This module does not come with the Apache HTTP Server and must be build and maintained separately.
Tomcat-Apache Proxy Documentation
- Tomcat Connectors Documentation describing the difference between the Tomcat HTTP and AJP connectors.
mod_proxy- Tomcat HTTP Connector
Configuration for the Tomcat HTTP connector (for use with Apache’s
mod_proxyandmod_proxy_http). - Tomcat Proxy Support - How To
Tomcat documentation showing how to use the build-in Apache module and
mod_proxy_httpfor Apache versions 1.3X and later.
- Tomcat HTTP Connector
Configuration for the Tomcat HTTP connector (for use with Apache’s
mod_jk- Tomcat AJP Connector
Configuration for the Tomcat AJP connector (for use with Apache’s
mod_jk). - The Apache Tomcat Connectors: mod_jk, ISAPI redirector, NSAPI redirector
Apache JServ Protocol (AJP) Protocol reference, configurations and fine-tuning of a reverse proxy set up using the
mod_jkApache module.
- Tomcat AJP Connector
Configuration for the Tomcat AJP connector (for use with Apache’s
Implementing The Tomcat-Apache Proxy Using HTTP
The following example shows how to implement a reverse proxy using the Apache HTTP Server and the Tomcat Servlet Container using HTTP via mod_proxy/mod_proxy_http.
Configure Apache HTTP Server To Use mod_proxy and mod_proxy_http
-
Ensure your Apache HTTP Server installation includes the
mod_proxyandmod_proxy_httpmodules.If you are uncertain, you can check to see if these modules are included either as a Dynamic Shared Object module or directly compiled into the
httpdbinary file by running theapachectl(a.k.a, Apache Control) command with the-Moption:# /usr/local/apache/bin/apachectl -M Loaded Modules: core_module (static) ... proxy_module (shared) proxy_http_module (shared) ... -
Configure the reverse proxy in the Apache HTTP Server.
Utilize the
ProxyPassandProxyPassReversedirectives to tell Apache to forward http://yourhost.edu/thredds/* to the Tomcat HTTP connector listening on port8080onlocalhost:ProxyPass /thredds http://localhost:8080/thredds ProxyPassReverse /thredds http://localhost:8080/threddsOr if you are setting up a reverse proxy to a TDS hosted on a different server other than
localhost:ProxyPass /thredds https://tds_host_location:8443/thredds ProxyPassReverse /thredds https://tds_home_location:8443/threddsNotice the use of the HTTPS protocol and port in the above example.
Important: We strongly encourage you to implement your reverse proxy over HTTPS instead of HTTP if you are proxying to a TDS instance installed on another host other thanlocalhost.
Configure Tomcat For The proxy
Configure the Tomcat HTTP Connector (or SSL/TLS HTTP/1.1 Connector) with the appropriate proxy settings:
   <Connector port="8080"
              protocol="HTTP/1.1"
              ...
              proxyName="yourhost.edu"
              proxyPort="80"/>
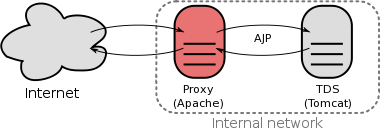
Implementing The Tomcat-Apache Proxy Using AJP
There are two options available for implementing a reverse proxy using the Apache HTTP Server and the Tomcat Servlet Container via AJP:
- Option A: using the
mod_proxy/mod_proxy_ajpmodules; or - Option B: using the
mod_jkmodule.
Option A: Configure Apache HTTP Server To Use mod_proxy and mod_proxy_ajp
-
Ensure your Apache HTTP Server installation includes the
mod_proxyandmod_proxy_ajpmodules.If you are uncertain, you can check to see if these modules are included either as a Dynamic Shared Object module or directly compiled into the
httpdbinary file by running theapachectl(a.k.a, Apache Control) command with the-Moption:# /usr/local/apache/bin/apachectl -M Loaded Modules: core_module (static) ... proxy_module (shared) proxy_ajp_module (shared) ... -
Configure the reverse proxy in the Apache HTTP Server.
Utilize the
ProxyPassandProxyPassReversedirectives to tell Apache to forward http://yourhost.edu/thredds/* to the Tomcat AJP connector listening on port8080onlocalhost:ProxyPass /thredds ajp://localhost:8080/thredds ProxyPassReverse /thredds ajp://localhost:8080/threddsNotice the use of the AJP protocol (
ajp://) in the above example.Note: AJP itself does not inherently provide encryption or security features, but instead relies on the network configuration and firewalls to restrict access to the AJP port.
Option B: Configure Apache HTTP Server To Use mod_jk
Build and Install mod_jk
-
Download the latest version of Tomcat’s
mod_jkmodule. -
Build and install the
mod_jkmodule as per the installation instructions that come bundled with the download. The build and installation will need to be done as eitherroot,sudo, or as user with privileges to modify Apache.# tar xvfz tomcat-connectors-1.2.xx-src.tar.gz # cd tomcat-connectors-1.2.xx-src/native # ./configure --with-apxs=/usr/bin/apxs <--- path to your apache apxs # make # make installConfirm the module was added to the directory in which the Apache HTTP Server stores its modules (
/usr/local/apache/modulesin this example):# cd /usr/local/apache/modules # ls -l mod_jk.so -rwxr-xr-x 1 root root 1147204 Oct 8 12:34 mod_jk.so
Configure Apache HTTP Server To Use mod_jk To Communicate With Tomcat
-
Update Apache configurations to use the
mod_jkmodule.mod_jkwas built as a DSO module, therefore you will need to update your Apache configurations to enable this 3rd-party module:The following example shows adding
mod_jkconfigurations to a Apache HTTP Server built from source.
Modify the main Apache server configuration file (usuallyhttpd.conf) in the following manner (in this example/usr/local/apache/confis where the Apache configuration files are located):# cd /usr/local/apache/conf # vi http.confAdd the following configurations to enable the
mod_jkmodule, restrict access to web applicationWEB-INFandMETA-INFdirectories, and tell Apache where to find theworkers.propertiesfile using theJkWorkersFiledirective. (Theworker.propertiesfile is discussed in more detail below.)# Third party modules LoadModule jk_module modules/mod_jk.so <IfModule jk_module> JkWorkersFile "conf/workers.properties" JkShmFile "logs/mod_jk.shm" JkLogFile "logs/mod_jk.log" JkLogLevel warn #Tomcat Security Section <LocationMatch "/WEB-INF/"> Require all denied </LocationMatch> <LocationMatch "/META-INF/"> Require all denied </LocationMatch> </IfModule>Note: Consult the Tomcat documentation for more information about themod_jkdirectives. -
Create a
workers.propertiesfile.The
mod_jkmodules in the Apache HTTP Server uses theworkers.propertiesfile to relevant map requests to the TDS using Tomcat’s AJP connector.Use your favorite text editor to create a
workers.propertiesfile in the Apache configuration directory that you specified in the previous step using theJkWorkersFiledirective:# cd /usr/local/apache/conf # vi http.confAdd the following configurations to the
workers.propertiesmodule to define aworkerthat will handle communication between the Apache HTTP Server and Tomcat.# workers.properties # To allow tomcat and apache to talk to each other. # needed by mod_jk # Define workers worker.list=worker1 # Define workers using ajp13 protocol to forward requests to the Tomcat processes. worker.worker1.type=ajp13 # TDS app # worker1 will talk to Tomcat listening on localhost at port 8009 worker.worker1.host=localhost worker.worker1.port=8009Note: Consult the Tomcat documentation for more information about the workers.properties file syntax and options. -
Configure your Apache host to send the appropriate requests to TDS via
mod_jkand Tomcat AJP.You will use the
JkMountdirectives that come with themod_jkto specify/match which URL requests should be proxied to the TDS in the Tomcat Servlet Container.The following shows an example of configuring an Apache
VirtualHostwith theJkMountdirectives.
Note that these directives reference theworkerconfigured in theworkers.propertiesfile in the previous step.<VirtualHost IP_ADDRESS:PORT> ServerName thredds.unidata.ucar.edu ... # Proxy requests to the TDS JkMount /thredds* worker1 JkMount /thredds worker1 # Proxy requests to the Manager App JkMount /manager* worker1 JkMount /manager worker1 ... </VirtualHost>Note: Consult the Tomcat documentation for more information about theJKMountdirective.
Configure Tomcat And The TDS For The Proxy
Configuring Tomcat and the TDS for the reverse proxy will be the same regardless of what option for the Apache HTTP Server.
-
Modify the Tomcat
AJP ConnectorIn the
${tomcat_home}/conf/server.xmlfile, locate theAJP Connector(uncommented and enabled by default) and add the following additional configuration to it:<!-- AJP 1.3 Connector on port 8009 --> <Connector port="8009" enableLookups="false" useBodyEncodingForURI="true" connectionTimeout="20000" protocol="AJP/1.3" />More Information: Consult the Tomcat documentation for more information about the AJP Connector configuration options. -
Disable any active
Java HTTP/1.1 Connectorand theSSL HTTP/1.1 ConnectorTomcat connectors.Important: Only perform this step is you have enabled Apache to handle the SSL/TLS encryption for Tomcat and the TDS.This will prevent direct communication to Tomcat via ports
8080and8443ensuring the AJP proxy via Apache is the only HTTP method by which to access Tomcat and the TDS.Locate the
Java HTTP/1.1 Connectorlistening on port8080and the activeSSL HTTP/1.1 Connectorlistening on port8443and comment them out:<!-- <Connector port="8080" protocol="HTTP/1.1" connectionTimeout="20000" redirectPort="8443" /> --> ... <!-- <Connector port="8443" protocol="org.apache.coyote.http11.Http11NioProtocol" maxThreads="150" SSLEnabled="true"> <SSLHostConfig> <Certificate certificateKeystoreFile="conf/localhost-rsa.jks" type="RSA" /> </SSLHostConfig> </Connector> --> -
Configure the TDS to relinquish control of TLS/SSL to Apache
Important: Only perform this step is you have enabled Apache to handle the SSL/TLS encryption for Tomcat and the TDS.The TDS deployment descriptor (
${tomcat_home}/webapps/thredds/WEB-INF/web.xml) is configured to only allow access parts of the TDS application via TLS/SSL.
Because we’ve disabled Tomcat’s handling of the TLS/SSL, we need to update these configurations.Use your favorite editor to open the TDS
${tomcat_home}/webapps/thredds/WEB-INF/web.xmlfile.
Around line106you’ll start seeing configurations that look like the following:<!-- tdsConfig with HTTPS needed for /admin access --> <security-constraint> <web-resource-collection> <web-resource-name>sensitive read access</web-resource-name> <url-pattern>/admin/*</url-pattern> </web-resource-collection> <auth-constraint> <role-name>tdsConfig</role-name> </auth-constraint> <user-data-constraint> <transport-guarantee>CONFIDENTIAL</transport-guarantee> </user-data-constraint> </security-constraint> ...These configs restrict access to the url in the
<url-pattern>tags to the role in the<role-name>tags (which correspond to the roles defined in the${tomcat_home}/conf/tomcat-users.xmlfile).
The<transport-guarantee>CONFIDENTIAL</transport-guarantee>says access must take place via HTTPS.For any restricted part of the TDS you want to access that is listed here, you’ll need to comment out the configurations in the
<user-data-constraint>tags:<!-- tdsConfig with HTTPS needed for /admin access --> <security-constraint> <web-resource-collection> <web-resource-name>sensitive read access</web-resource-name> <url-pattern>/admin/*</url-pattern> </web-resource-collection> <auth-constraint> <role-name>tdsConfig</role-name> </auth-constraint> <!-- do not use tomcat https <user-data-constraint> <transport-guarantee>CONFIDENTIAL</transport-guarantee> </user-data-constraint> --> </security-constraint> ...Warning: If you leave outside access to the TDS and Tomcat open via port8080this once protected portion of the TDS is now open in the clear. Hence, we recommend disabling these connectors if you are using Apache as a proxy.
Also, keep these changes to the configurations in mind if you ever decide to reverse or undo the Apache reverse proxy!
Changing The TDS Context Path (/thredds)
We do not recommend changing the TDS context path (the /thredds part of the URL path).
However, if your network configuration requires that you use a different context path (e.g., /my/thredds) or you are proxying two TDS installations and need to differentiate them with different context paths (e.g., /thredds1 and /thredds2 ), you will need to make the following changes:
-
Rename the
thredds.warfile to match the desired context path before you deploy it to Tomcat. Tomcat and other servlet engines direct incoming requests to a particular web application when the beginning of the request URL path matches the context path of that particular webapp. The easiest way to let Tomcat (or any other servlet engine) know what context path to use for a given webapp is to rename that webapp’s.warfile before deploying it to Tomcat.For instance, if you want all URLs starting with
/thredds2to be handled by your TDS install, rename thethredds.warfile tothredds2.warbefore you deploy it to Tomcat.If the desired context path is a multi-level context path (e.g.,
/my/thredds), you must use a pound sign (“#”) in the.warfilename to encode the slash (/). In this case, thethredds.warfile would need to be renamed tomy#thredds.war.Important: The deployment descriptor (web.xmlfile) is overwritten during deployment which means this edit must be done every time the TDS is re-deployed. -
Edit the TDS
web.xmlfile and change the value of theContextPathparameter to match the desired context path.The TDS uses the value of the
ContextPathcontext parameter (as defined in the TDSweb.xmlfile) when generating TDS URLs in certain situations. To make sure all generated URLs are consistent, you must change the value of theContextPathparameter to match the desired context path.(Changing the value of
ContextPathwill no longer be necessary in a future release once we require Tomcat 6.0 (Servlet 2.5).The TDS
web.xmlfile is located in${tomcat_home}/webapps/<contextPath>/WEB-INF/web.xml, where<contextPath>is the value of the desired context path. TheContextPathcontext parameter is defined in theweb.xmlfile (starting at line12):<context-param> <param-name>ContextPath</param-name> <param-value>thredds</param-value> </context-param>For the
/thredds2example, it should be changed to:<context-param> <param-name>ContextPath</param-name> <param-value>thredds2</param-value> </context-param>And for the
/my/threddsexample, it should be changed to:<context-param> <param-name>ContextPath</param-name> <param-value>my/thredds</param-value> </context-param> -
Edit your TDS configuration catalogs and change the service base URLs to start with the desired context path.
So that users will receive the correct data access URLs for datasets served by your TDS, the base URLs given by the
serviceelements in your TDS configuration catalogs must match the desired context path.An OPeNDAP service element on a TDS with the context path of
/thredds2would need to look similar to this:<service name="odap" serviceType="OPeNDAP" base="/thredds2/dodsC/"/>And, similarly, an OPeNDAP
serviceelement on a TDS with the context path of/my/threddswould need to look similar to this:<service name="odap" serviceType="OPeNDAP" base="/my/thredds/dodsC/"/>
Troubleshooting Tips
- Check the catalog URL in the title of the HTML view of catalogs matches the requested URL.
- Check the Data Access URL in the OPeNDAP Data Access Form matches the requested URL (minus the
.htmlsuffix). - If you have TDS Remote Management configured, go to the TDS debug page (e.g., http://localhost:8080/thredds/admin/debug) and follow the “Show HTTP Request info” link.
-
Once there, check the values listed for server name and port and the context path all match the appropriate values from the request URL, e.g., for the URL http://localhost:8080/thredds/admin/debug?General/showRequest , the values should be:
 req.getServerName(): localhost
 req.getServerPort(): 8080
 req.getContextPath(): /thredds